Cooking Classes

Showing posts with label dinner for one. Show all posts

4.3.16

Curried Couscous and Sidestripe Prawn Salad


Serving only sustainably harvested seafood is very important to me. BC sidestripe shrimp is ethically and sustainably harvested. It is a top choice of the Vancouver Aquarium's Ocean Wise program. Always look for their logo on any fish or seafood you purchase.

A long time ago when I was in real estate sales one of my clients was from mainland China. Every time his entourage came into town we had a feast at his partner's restaurant. That is when I first learned to eat shell-on shrimp. Now it is the only way I want it.

Curried Couscous and Sidestripe Prawn Salad

1/2 cup cooked couscous
1/4 cup corn kernels
1/2 teaspoon Madras curry powder
2 teaspoons peach chutney
1/2 small head of romaine lettuce
8 side stripe prawns
1 teaspoon smoked paprika
olive oil
sea salt

Wash and crisp romaine leaves. Leave them whole.

Cook couscous according to package instructions. When finished add curry powder, corn kernels and one teaspoon of chutney. Stir to mix. Season with sea salt to taste. Set aside

Toss prawns with smoked paprika and add to a hot pan that has been oiled with olive oil. Turn once and cook until done.

Prepare salad by laying 2-4 romaine leaves on a plate. Fill with couscous. Top with sauteed prawns. Serve immediately. Serves one.

2.5.15

Avocado Salad with Chickpeas

The avocados are brilliant at the moment. True, they are plentiful and inexpensive but you just can't beat the flavour of in-season produce. Avocados alone are a good source of fibre but add in chickpeas and the nutritional value becomes even more complex.

Piment d'esplette is a variety of chili peppers that is cultivated in the French Pyrenees in the Basque region. It is only mildly hot so can be used freely. Locally it is used as we use black pepper. Substitute with freshly ground black pepper if you wish.

Avocado Salad with Chickpeas

This salad is a meal for one person. Increase amounts to serve more.

1/2 avocado, cubed
1/2 tomato, roughly chopped
1/4 c. cooked chickpeas
juice of 1/2 lemon
2 tbsp. olive or camelina oil
crispy iceberg lettuce
fleur de sel
piment d'esplette

Peel and cube half an avocado into a medium sized bowl. Squeeze lemon juice over and toss gently. Add the chopped tomatoes and chickpeas. Drizzle with the olive oil and toss again.

Arrange lettuce leaves on your serving plate and carefully arrange the salad on top. Drizzle with any of the dressing that remains in the bowl. Garnish with fleur de sel and piment d'esplette and serve.

1.12.14

Baked Potato with Smoked Salmon Sour Cream

Baked potatoes are generally reserved for the hot days of summer, not these icy winter days. But I have found a way to bring the simple baked potato into the season. This smoked salmon cream cheese baked potato can be lunch, brunch or dinner. I would ever consider it for breakfast. So simple and tasty.

Oven bake foil wrapped potatoes and served with a healthy spoonful of this sour cream mixture.

Smoked Salmon with Sour Cream
1 pound hot-smoked boneless salmon, divided
3/4 cup sour cream
1 teaspoon finely grated lemon rind
1 tablespoon fresh lemon juice
1/4 teaspoon freshly ground black pepper
1/4 cup chopped fresh chives
Place half of salmon, sour cream, rind, juice and pepper in a food processor. Process until smooth. Transfer mixture to a bowl.
Coarsely chop remaining salmon, and fold into salmon mixture. Gently fold in 1/4 cup chives. Cover and chill. Garnish with additional chopped chives, if desired.

3.11.14

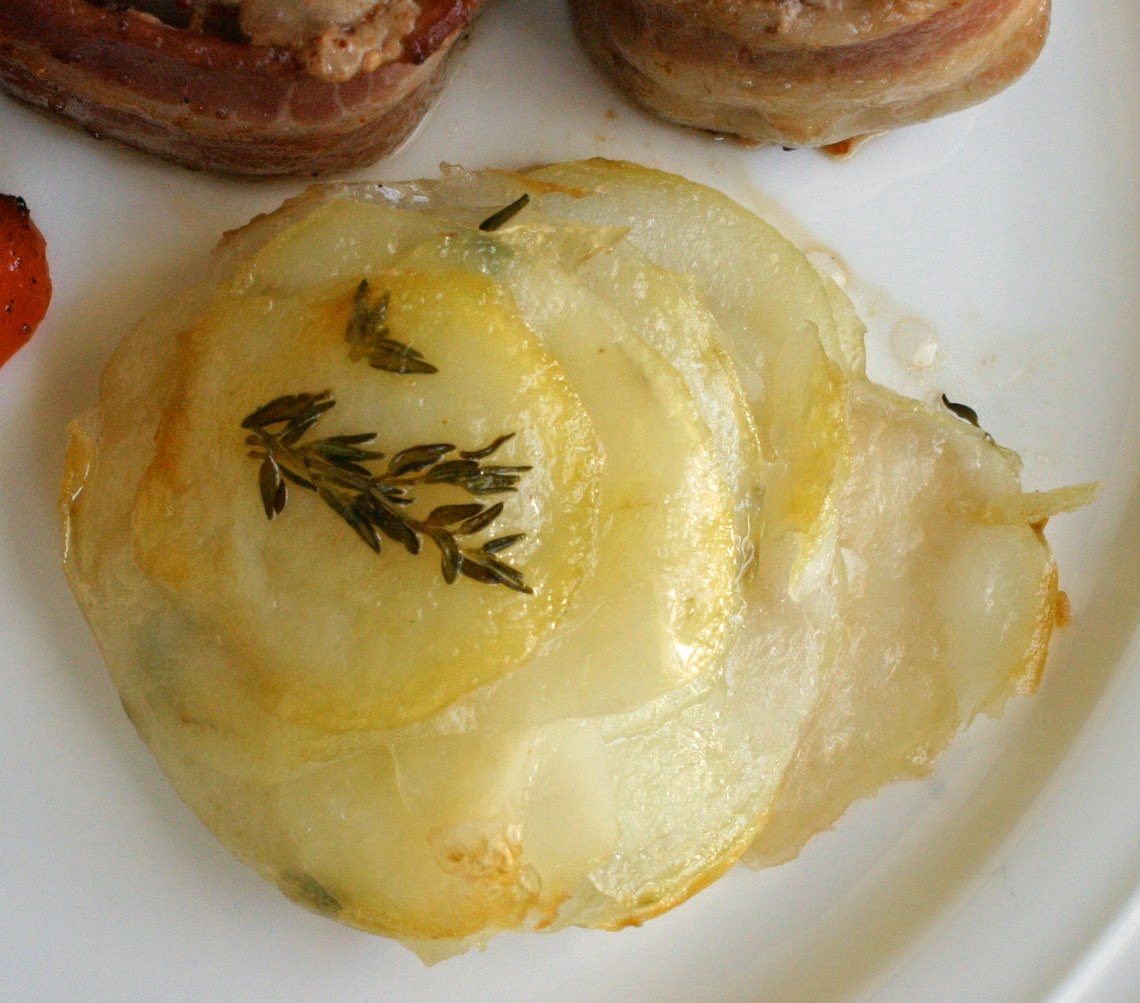
Bacon Wrapped Pork Medallions with Individual Pommes Anna


As I organize and make list after list for my upcoming drive to Victoria, BC (read 'seafood') I am still reminded by tummy growls that I must make food. I am a recovered hoarder and now check my freezer first before planning meals. I have a beautiful naturally raised pork tenderloin from Carmen Corner Meats in Waldheim, SK. And I still have market potatoes and carrots.

Rather than grill up the entire tenderloin as I usually do I decided to cut it into medallions and then pan grill. After making this recipe I have decided that it is a good one to make for a crowd. It is relatively inexpensive yet looks elegant. It can be prepped in advance and cooked all at once in a large pan. If I was catering this would be on my menu for sure.

Pommes Anna, obviously a French version of a potato dish, has been cropping up a lot lately. Ditto this for a crowd. I made mine in a muffin tin for an individual size serving but it could also be made in a pan and cut into squares for serving.

I like easy peasey recipes and have also been wanting to play with my piment d'esplette that I purchased back in the spring. Time flies, doesn't it. I have already kept it long enough. Ground spices and herbs have a shelf life of up to 2 years. Some say 12 months.

Piment d'esplette is the champagne of hot chiles in more way than one. It is a chili pepper that is cultivated in the Basque region of France in the Atlantic Pyrenees. These peppers were introduced from Mexico in the 16th century. Initially they were used medicinally but later became a staple in flavouring their food. Now it has AOC status. This is appellation d'origine de contrȏlée which translates to 'controlled designation of origin'. So you see, it is like champagne. Unless it comes from the Esplette region it cannot have this name.

What is so special about this chile, you say? It is only 4000 on the Scoville scale of heat so it isn't that hot but it is packed with flavour. It has a slightly smokey flavour. It has replaced black pepper in many Basque recipes.


Bacon Wrapped Pork Medallions

1 small pork tenderloin
8 - 10 slices bacon
sea salt
piment d'esplette

Remove tenderloin from the refrigerator about 30 minutes before you will be cooking. Season generously with piment d'esplette and sea salt. Cut into medallions the thickness of the bacon slice.

Preheat your oven to 350 F.

Slowly sauté slices of bacon in a heavy grill pan or cast iron pan until browned but not crispy. If they are too crispy they won't wrap around the medallions. Wrap medallions with the bacon pieces and secure with a toothpick. Season both top and bottom of the medallion with more piment d'esplette and sea salt. It is a thick piece of meat and the seasoning has to compensate for that so be liberal.

Over medium heat in the same pan used for the bacon place the medallions flat side down and sauté until bottom is golden, about 3 or 4 minutes. Turn over and brown the other side. Place the pan in the oven and continue to cook until the meat is no longer pink in the centre. An internal temperature of 145 F is ideal. Remove from the oven and tent with foil until ready to serve.

Mini Pommes Anna

small potatoes
butter
garlic
fresh thyme
sea salt

Peel potatoes and slice with a mandoline so they are almost transparent thin. I don't have a mandolin so I used my box grater. You know, that side you never use? It worked perfectly to make very thin slices.

Melt butter and brush each muffin tin with the butter. Place a round piece of parchment paper on the bottom of each muffin. Place a small sprig of thyme and then drizzle about half a teaspoon of butter in each cup.

Add minced garlic and more chopped thyme to the butter. 

If you are not immediately using the sliced potatoes put them in a bowl of cold water. If left in the air they may discolour. Before using, drain the water and dry the potatoes in a clean tea towel. Place in a bowl and drizzle with the seasoned butter and mix well.

Arrange the potato sliced in each muffin cup. Press down and fill as high as possible. It will wilt down during cooking. Cover tightly with tin foil and bake in 350 F oven for about 15 minutes. Remove the foil and bake for another 15 minutes or until tender and nicely browned on the edges.


5.7.14

Shrimp and Cheese Grits


I spent five months housesitting in Tennessee a few years back. I learned to cook with collard greens, okra and attended more than a few church potlucks. Southern food is comfort food at its best. Grits might not be so easy to find up here in Canada but if you ever see them, snap them up. They are a quick and easy nutritious meal. This recipe is an all time favourite.

Shrimp and Cheese Grits
Grits are a truly American food. They are made from dried yellow or white corn that is ground and then boiled. It can be purchased in its original form that is long cooking or quicker cooking varieties. This dish was considered a basic fisherman’s breakfast during shrimp season. Now it is served at any meal either as a side dish or the main course. Polenta or cornmeal can be substituted for grits but they are more finely ground and will produce a creamier dish.
Grits
2 c. water 500 mL
2 c. half and half cream 500 mL
2 tbsp. chopped red pepper 30 mL
1 tsp. salt 5 mL
1 c. stoneground grits 250 mL
1 c. shredded Cheddar cheese 250 mL
2 tbsp. butter 30 mL
Pepper to taste
Bring water, cream, butter, red pepper and salt to a boil in a 3-qt. (4 L) saucepan. Whisk in grits. Reduce heat to medium-low, and cook stirring often, about 30 minutes or until tender. Remove from heat and stir in cheese. Season with pepper, to taste.
Shrimp
2 bacon slices
1 lb. peeled, medium-size raw shrimp 500 g
1/8 tsp. salt 1 mL
1/4 tsp. pepper 2 mL
1/4 c. all purpose flour 60 mL
2 tsp. oil 10 mL
1/2 c. chopped green onions 125 mL
2 garlic cloves, minced
1/2 c. chicken broth 125 mL
2 tbsp. fresh lemon juice 30 mL
1/4 tsp. hot sauce 2 mL
Cook bacon in a large nonstick skillet over medium heat 10 minutes or until crisp, remove and drain on paper towels, reserving one-teaspoon (5 mL) drippings in skillet. Crumble bacon.
Season shrimp with salt and pepper; dredge in flour. Sauté green onions 2 minutes. Add shrimp and garlic, and sauté 2 minutes or until shrimp are lightly browned. Stir in chicken broth, lemon juice, and hot sauce and cook 2 more minutes, stirring to loosen particles from bottom of skillet. Spoon shrimp mixture over the hot grits. Garnish with crumbled bacon and serve with a hot sauce such as sriachi. Serves 4. (Adapted from Southern Living)

19.5.14

Rapini and Chive Omelet


Where has the time gone? Really. It feels like only a short while ago I was visiting my vegetarian sister and making all these great and wonderful healthy dishes. Somewhere after the end of January I fell off the healthy eating wagon. It happens. It does happen and no point beating myself up over it.

Finally, today in the middle of May I am back on track. Actually the beginning was last week while I was enjoying decadent local and fresh healthy food in the Okanagan.

Farm eggs in my almost empty refrigerator were beckoning. Don't forget me..me..me they echoed.


Fresh chives are ready in my garden, rapini in the crisper drawer and a lonely tomato rounded out a wonderful simple omelet for lunch.

Rapini and Chive Omelet

1 c. coarsely chopped rapini
2 free range farm eggs
1/2 tomato, coarsely chopped
2 tbsp. snipped chives
sea salt
freshly ground black pepper
oil for the pan

Boil the chopped rapini for a couple of minutes and drain well. Boiling takes away some of the inherent bitterness.

Whisk the eggs for a minute or two and add snipped chives.

Heat a small pan over medium and add a splash of olive oil. When the pan is fully heated arrange the rapini and chopped tomatoes. Pour over the eggs and chives to evenly distribute. Cover and cook over medium-low heat until set. Serve immediately. Season with sea salt and freshly ground black pepper.

7.5.13

Veal Scallopini with Brown Butter and Capers

I am home again from a most amazing food holiday in the Okanagan in British Columbia. I attended two conferences back to back and ate like a queen for an entire week. I must say that coming home is a step down. You will read more about these events in my upcoming posts. I am still unpacking and sorting all the notes I took.

Whilst passing through Calgary I did have an opportunity to do some shopping. I was delighted to find veal at the Midtown Co-op. This is my favourite grocery in the city. Tonight I cooked veal scallopini aside rapini. Neither of these foods are available in my little town in Saskatchewan. Such a treat. You must try this recipe for a special meal. It is so simple with flavourful results.

Veal Scallopini with Brown Butter and Capers   from Epicurious.com
  • 3 tablespoons olive or vegetable oil
  • 1/2 cup all-purpose flour
  • 1 pound thin veal scallopini (less than 1/4 inch thick)
  • 1/2 stick unsalted butter, cut into pieces
  • 1 1/2 tablespoons red-wine vinegar
  • 1 1/2 tablespoons drained small capers
  • 2 tablespoons chopped flat-leaf parsley

Heat a 12-inch heavy skillet (not nonstick) over high heat until hot, then add oil and heat until it shimmers.
Meanwhile, stir together flour, 1 teaspoon salt, and 1/2 teaspoon pepper, then pat veal dry and dredge in flour, knocking off excess.
Cook veal in 2 batches, turning once, until browned and just cooked through, 2 to 2 1/2 minutes per batch. Transfer to a plate.
Discard oil from skillet, then add butter and cook over medium heat, shaking skillet frequently, until browned and fragrant, 1 to 2 minutes. Stir in vinegar, capers, and 1/4 teaspoon each of salt and pepper. Return veal to skillet just to heat through, then sprinkle with parsley.


7.3.11

Last Minute Flatbread

I am dying to try my new gas range with steam assist.  But I do not have a clue what its potential is.  Yesterday I made a simple flatbread.

I like Mario Batali's pizza dough recipe for a flatbread.  I make a whole batch and roll them into personal size flatbreads.  The other 3 rolled crusts are in my freezer for 'fast food' some day soon.

In my pantry I had basil pesto, artichoke hearts, goat cheese and sundried tomatoes.  I wish I had thought to add some toasted pinenuts.  This is a perfect Mediterranean flatbread.

The oven created a wonderfully toasted and cooked pizza crust.  I used my pizza stone.  Perfect Sunday nosh.

9.11.10

Truffled Potato Perogy Soup

I made perogies for The Daring Cooks challenge a while ago and, although the perogies were wonderful, the dough was rolled to thinly for keeping well in the freezer.  They would break up when boiling and I discarded a lot of nice food.

Then I had a bright idea!  How about using them in soup.  If they burst and spilled their contents, it would just add to the flavour of the soup.

I used my homemade duck broth from this post.  And my perogies from this post.   When I made one of my batches of perogies, I added a dollop of black truffle sauce to the mashed potatoes.  The result was divine.  The truffle flavour actually came out nicer in the soup than they did when I served the perogies in the traditional style with sour cream.

I brought the broth to a boil.  Salted to taste.  Plopped in the perogies and continue to gently simmer until they were done.  There is a nice glisten of duck fat on the surface and the flavour was amazing.

26.10.10

Potato and Chard Frittata


We must savour every fresh moment until we find ourselves in the doldrums of winter.  This is only potatoes and chard but tastes so nice and fresh.  I bought the chard a few days ago at a farmer's market.  It is so much more substantial than spinach.  It is so full of nutrients and fibre.

I made this in an All Clad skillet and then baked it in the oven for a little while to be sure it was fully cooked.  It is hearty and light all at the same time.

Potato and Chard Fritatta

2 medium sized potatoes
2 leaves of chard
2 ounces of freshly grated parmesan cheese
freshly ground black pepper
2 eggs

Very thinly slice the potatoes and set aside.  Remove the ribs from the chard and rip the leaves into smallish bits and set aside.

Heat oil in a skillet until smoking.  Add a layer of potato slices, then a layer of the chard and another layer of potato slices.  Grate cheese over all.  Lightly beat the eggs and pour over.

Cook on the stove top until the bottom is crispy and done.  Flip the galette onto a plate and slide it back into the pan to cook the top side.  Put in a 350F oven for another 10 minutes.  Serve immediately.

18.8.10

Pear and Asiago Flatbread

I have frozen some thin crust pizza crusts.  I also have a new pizza stone!  Pardon the quick picture but I loved this impromptu dinner.  I brushed the pizza dough with hazelnut oil.  Sliced a fresh pear.  Ground some coarse black pepper.  Shaved off some asiago.  In the oven for 10 minutes and it was so good.

19.5.10

Spinach and Asiago Souffle


Spinach and Asiago Souffle

  • 3/4 cup half and half cream
  • 2 tablespoons butter
  • 1 tablespoon all purpose flour
  • 3 large egg whites
  • 2 tablespoons chopped shallots
  • 2 cups fresh spinach, stems removed, washed, steamed, drained, squeezed dry and finely chopped
  • 3/4 cup grated Asiago cheese
  • 1/4 teaspoon salt
  • 1/4 teaspoon ground black pepper
  • pinch ground nutmeg
Preheat oven to 350°F. Butter two individual souffle dishes. Bring cream to boil in medium saucepan. Remove from heat. Melt 1 tablespoon butter in heavy medium saucepan over low heat. Add flour; stir 3 minutes. Gradually whisk in warm cream. Increase heat to medium; whisk constantly until mixture is thick and smooth, about 4 minutes. Remove sauce from heat.  Cool slightly.
Melt 1 tablespoon butter in large skillet over medium heat. Add shallots; sauté until tender, about 3 minutes. Transfer to large bowl. Mix in sauce, spinach, cheese (reserving 2 tablespoons for later), salt, pepper and nutmeg. (Can be made 2 hours ahead. Cover and let stand at room temperature. Stir over low heat until just lukewarm before continuing.)
Using electric mixer, beat egg whites in large bowl until stiff but not dry. Fold whites into spinach mixture in 2 additions. Transfer to prepared baking dishes. Sprinkle with 2 tablespoons of grated cheese. Bake until puffed and set about 20 minutes

13.5.10

Corned Beef Hash

Now that the rain has stopped and the sun is bright, I am back outside working on my house and garden.  Yesterday I took care of a huge branch that fell off my crabapple tree and cleared dead wood from my Dogwood.  And put the second coat of paint on my foundation so I can now order in soil to top up my beds.  Then I will be ready for planting! 

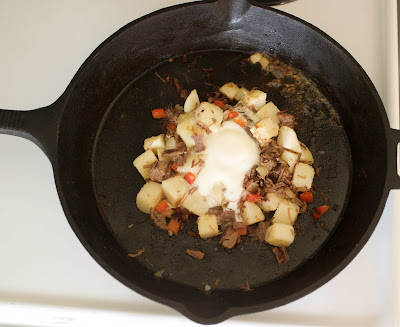
So I have not been cooking very much.  I have never made corned beef hash.  This is inspired by a recipe from Epicurious.com   I use that website a lot. 

I made this with my big ol' cast iron pan.  But wouldn't it be fun, if you had a set of small cast iron pans, to serve it directly to the table with each person having their own pan!  The food would stay hot for a long time.  Everybody would get lots of nice crispy pieces.


Corned Beef Hash                       serves one
  • 1 baking (russet) potatoes, peeled and cut into 1/4-inch dice
  • 1/2 cup cooked corned beef, cut into chunks
  • 2 tablespoons chopped onion
  • 2 tablespoons red bell pepper, cut into 1/4-inch pieces
  • 1 tablespoons unsalted butter
  • 1 tablespoon heavy cream
  • 1 large egg (optional)
  • 1 tablespoon chopped fresh flat-leaf parsley
Cook potatoes in boiling salted water to cover until just tender, about 3 minutes, then drain. Coarsely chop corned beef.
Sauté onion and bell pepper in butter in a small nonstick skillet over moderately high heat, stirring, until lightly browned, about 5 minutes. Add potatoes and sauté over moderately high heat, stirring occasionally, until browned, about 5 minutes. Stir in corned beef and salt and pepper to taste, then cook, stirring occasionally, until browned. Add cream and cook, stirring, 1 minute.
If desired, make a hole in hash and break 1 egg into it. Cook over moderately low heat, covered, 5 minutes, or until egg is cooked to desired doneness, and season with salt and pepper. Garnish hash with parsley.

6.5.10

Curried Squash Soup

I know that many of you are enjoying nice spring/summer weather today.  But where I am in Canada (I hate to perpetuate the myth of the Great White North) there is snow on the ground today.

Yesterday I made a wonderful Thai lime lemongrass curry sauce and decided to use it as the flavouring for this soup.  Click on the link for the curry sauce and you will find the recipe.  This is so easy and delicious.

Curried Squash Soup                       single serving

1 cup cooked butternut squash
1/4 cup Thai curry sauce
chicken broth, as desired

Place the squash and curry sauce in a food processor and puree.  Add chicken broth to obtain the desired consistency.  Heat the puree in a saucepan then ladle into a bowl.

29.4.10

Dulce de Leche Cheesecake

 Dulce de Leche Cheesecake
 
To make two 4 inch diameter cakes.

For the cheesecake filling:
1 cups cream cheese
1/2 cup cajeta or  dulce de leche
2 eggs

For the crumb crust:
3/4 cup plain cookies
2 tablespoons butter


Preheat your oven to 350F.
Prepare your baking rings or spring-form pans: Cover the base of the spring-form pan with a sheet of baking paper, and close the pan around the paper and the base.

Prepare the crust: Blend the cookies and butter in a food processor. Dump into the pans, and pack into an even layer with a spoon or your fingers.

Prepare the filling: Beat together the dulce de leche, cream cheese and eggs. Pour into the pans.

Bake the cakes: Bake 4-inch cakes for 30 minutes. Cover with tinfoil after the first 10 minutes to keep the top from browning. (I completely forgot about covering with foil.  That along with my fast oven, it had a lot of cracking.)

After baking time is done, let cool for 30 minutes to an hour in the oven, with the door cracked open. Once cakes are cool enough to handle, remove from the oven and let cool completely to room temperature. (The slow cooling process keeps the cheesecakes from cracking on top.)
Once the cakes are cool, remove the sides of the spring-form pan.  I made a simple blackberry sauce by boiling blackberries with a little water and sugar.  Thickened with a cornstarch slurry and added a squeeze of lemon.  It was so good without being really sweet.

I know these look like cherries!  Honest, they are cooked blackberries.  I prefer blackberries when they are cooked rather than fresh.

Half of this recipe is definitely enough for 2 people.

30.1.10

Saturday Blog Showcase - Anitpasti Plate #2

I want to use some things in the fridge.  Homemade prosciutto from La Table de Nana, grilled halloumi cheese, ginger pickled beets, olives and crostini from homemade baguettes.  I also added some marinated artichoke hearts and roasted sweet orange bell peppers.

I pan fried the halloumi in olive oil until browned and then sprinkled with dried thyme.  Delish.

This is also my Saturday Blog Showcase entry with La Table de Nana's prosciutto.  The Showcase is being hosted by All That Splatters this week.


As Nana says:

It's a fun easy and quick project..You buy a small pork loin.. smaller in diameter is better..and encrust it in salt mixed w/ Herbes De Provence..

I used Sel de Guérande..the same salt I make my flavored salt with and my balsamic salt..

Roll the loin tightly in a clean crisp dishcloth and put in your refrigerator for 4 to 5 days.. then open.. and enjoy~
Si Bon!

21.1.10

Last Lunch in Tennessee


I will be leaving soon and want to do something special to mark this time I have spent in Tennessee and this time I have spent so far with my new blogging friends.  Today I will share the menu I have chosen for my last real cooked lunch before I begin my journey back to Canada.

It has been a monumental task to choose menus for these last meals.  So many meals....so little time!  I was totally intrigued by Shrimp Saganaki from more than burnt toast.  I think it would be fun for lunch.

Alas, I got all the way through the recipe and was about to put it under the broiler to grill, and the broiler doesn't work in this oven!  How frustrating.  So now I am waiting for the oven to heat to 400F so I can just bake it.  I used shredded halloumi cheese and it was great.  It is a grilling cheese, but as you can see it did melt nicely when shredded.

I wanted a light salad as accompaniment.  I took my inspiration for a salad from  Spinach Salad at la bella vita.  And what is lunch without bread.  I made a version of  Pain l'Ancienne from Crisis Brownies.  I actually used my sourdough starter, added flour, kneaded and worked it into a baguette. It turned out very nicely - good crust and soft inside.

Shrimp Saganaki
(for one meal sized portion)

6 large whole shrimp
1/4 cup olive oil

1/2 small red onion, sliced

1/4 green bell pepper, sliced

1/4 yellow bell pepper, sliced

some diced hot banana pepper
(depending how spicy you like your dish)

1 medium ripe tomato, diced

1/2 cup button mushrooms, sliced

half cup Greek feta, coarsely crumbled

1 tsp. dried Greek oregano

splash of Ouzo
Grated Mozzarella (or other white cheese)
salt to taste

  1.  In a saucepan, add your olive oil over medium-high heat and add your mushrooms and saute for 2-3 minutes or until they have browned. Now add your onions, peppers and tomatoes and simmer for another 5-7 minutes or until you end up with a nice thick sauce.
  2. Take off the heat and add your crumbled feta, oregano and Ouzo and stir in. Taste and adjust seasoning with salt (if any required) and additional heat (if desired).
  3. Pour the mixture into an oven-safe baking vessel (like the saganaki) and arrange the shrimp on top. Grate some Mozzarella on top and place under the broiler for about 5 minutes or until the shrimp have turned pink and the cheese becomes a golden brown.
  4. Serve with crusty bread, Greek ouzo and with good company.


Pain à l'Ancienne, Recipe © Peter Reinhart, Bread Baker's Apprentice


Days to Make: 2
Day 1: 10 to 15 minutes mixing
Day 2: 2 to 3 hours fermentation, shaping, and panning; 15 to 30 minutes baking
Makes 6 small baguettes, 6 to 8 pizzas, or one 17 by 12-inch focaccia
6 cups (27 ounces) unbleached bread flour
2 1/4 teaspoons (.56 ounce) salt
1 3/4 teaspoons (.19 ounce) instant yeast
2 1/4 cups plus 2 tablespoons to 3 cups (19 to 24 ounces) water ice cold (40°F)
Semolina or cornmeal for dusting
1. Combine the flour, salt, yeast and 19 ounces of water in the bowl of the electric mixer with the paddle attachment and mix for 2 minutes on low speed. Switch to the dough hook and mix for 5 to 6 minutes on medium speed. The dough should be sticky on the bottom of the bowl, but it should release from the sides of the bowl. If not, sprinkle in a small amount of flour until this occurs (or dribble in water if the dough seems too stiff and clears the bottom as well as the sides of the bowl). Lightly oil a large bowl and immediately transfer the dough with a spatula or bowl scraper dipped in water into the bowl. Mist the top of the dough with spray oil and cover the bowl with plastic wrap.
2. Immediately place the bowl in the refrigerator and retard overnight.
3. The next day, check the dough to see if it has risen in the refrigerator. It will probably be partially risen but not doubled in size (the amount of rise will depend on how cold the refrigerator is and how often the door was opened). Leave the bowl of dough out at room temperature for 2 to 3 hours (or longer if necessary) to allow the dough to wake up, lose its chill, and continue fermenting.
4. When the dough has doubled from its original prerefrigerated size, liberally sprinkle the counter with bread flour (about 1/2 cup). Gently transfer the dough to the floured counter with a plastic dough scraper that has been dipped in cold water, dipping your hands as well to keep the dough from sticking to you. Try to degas the dough as little as possible as you transfer it. If the dough is very wet, sprinkle more flour over the top as well as under it. Dry your hands thoroughly and then dip them in flour. Roll the dough gently in the sprinkled flour to coat it thoroughly, simultaneously stretching it into an oblong about 8 inches long and 6 inches wide. If it is too sticky to handle, continue sprinkling flour over it. Dip a metal pastry scraper into cool water to keep it from sticking to the dough, and cut the dough in half widthwise with the pastry scraper by pressing it down through the dough until it severs it, then dipping it again in the water and repeating this action until you have cut down the full length of the dough. (Do not use this blade as a saw; use it as a pincer, pinching the dough cleanly with each cut.) Let the dough relax for 5 minutes.

5. Prepare the oven for hearth baking as shown on pages 91-94, making sure to have an empty steam pan in place. Preheat the oven to 500°F (550°F if your oven goes this high). Cover the back of two 17-by-12-inch sheet pans with baking parchment and dust with semolina flour or cornmeal. Proceed with shaping as shown below.

Shaping Pain À l’Ancienne Baguettes:
Take one of the dough pieces and repeat the cutting action, but this time cut off 3 equal-sized lengths. Then do the same with the remaining half. This should give you 6 lengths.
Flour your hands and carefully lift 1 of the dough strips and transfer it to an inverted parchment-lined pan, gently pulling it to the length of the pan or to the length of your baking stone. If it springs back, let it rest for 5 minutes and then gently pull it out again. Place 3 strips on the pan, and then prepare another pan and repeat with the remaining strips.
6. Score the dough strips as for baguettes (page 90) slashing the tops with 3 diagonal cuts(or see Commentary regarding scissors). Because the dough is sticky, you may have to dip the razor blade, or serrated knife or scissors in water between each cut. You may also omit the cuts if the dough isn't cooperating.

7. Take 1 pan to the preheated oven and carefully slide the dough, parchment and all, onto the baking stone (depending on the direction of the stone, you may choose to slide the dough and parchment off the side of the sheet pan instead of off the end); or bake directly on the sheet pan. Make sure the pieces aren't touching (you can reach in and straighten the parchment or the dough strips if need be). Pour 1 cup of hot water into the steam pan and close the door. After 30 seconds, spray the oven walls with water and close the door. Repeat twice more at 30-second intervals. After the final spray, reduce the oven setting to 475°F and continue baking. Meanwhile, dust the other pan of strips with flour, mist with spray oil, and cover with a towel or plastic wrap. If you don't plan to bake these strips within 1 hour, refrigerate the pan and bake later or the next day. If you’d like to bake them as rustic, ciabatta-style breads, leave them at room temperature for 1 to 2 hours and then bake. As the loaves proof, they will resemble and perform like ciabatta.
8. The bread should begin to turn golden brown within 8 or 9 minutes. If the loaves are baking unevenly at this point, rotate them 180 degrees. Continue baking 10 to 15 minutes more, or until the bread is a rich golden brown and the internal temperature registers at least 205°F.

9. Transfer the hot breads to a cooling rack. They should feel very light, almost airy, and will cool in about 20 minutes. While these are cooling, you can bake the remaining loaves, remembering to remove the parchment from the oven and turn the oven up to 500°F or higher before baking the second round.
COMMENTARY:

This dough also makes a great oil-free pizza dough or focaccia. Refer to the variations that follow and then the formulas for Pizza Napoletana (page 207) and Focaccia (page 159).
This dough is very sticky, like ciabatta dough, so it is best made in an electric mixer or a food processor (page 55). However, if mixing by hand, use the method described on page 56.
One of the testers of this recipe, Jill Myers, suggested using sharp scissors to score the bread instead of a knife or razor. This is a great idea, as the wet dough is difficult to slit in the normal manner. If you are using this method, try to get a long angle with the shears and make a long cut rather than just short snips.


Pain À l’Ancienne Pizza: Heavily flour the counter and gently transfer the fully fermented dough from the bowl to the counter with a plastic scraper that has been dipped in cold water, dipping your hands as well to keep the dough from sticking to you. Divide the dough by continually dipping the pastry scraper into water and cutting the dough into 6 to 8 equal pieces. Gently round the pieces into balls, being careful not to punch down and expel any more gas than necessary. Line a sheet pan with baking parchment and spray lightly with oil. Place the floured dough balls on the parchment. Mist them with spray oil and place the pan into a food-grade plastic bag or loosely cover with plastic wrap, and return the pan to the refrigerator, unless you plan to make the pizzas immediately. These pizza doughs will keep for up to 3 days in the refrigerator. (You may also put them into the freezer in individual zipper bags, and keep them for up to three months.) Remove the desired number of dough balls from the refrigerator 2 hours before shaping and baking your pizza as you always do.
Pain À l’Ancienne Foccacia: Line a 17 by-12-inch sheet pan with baking parchment. With floured hands, take the fully fermented dough from the bowl and proceed with shaping instructions on page 162. Ferment at room temperature for about 2 to 3 hours, or until the dough rises and fills the pan, rising to about 1 inch thick. Proceed with the baking instructions for focaccia.

17.1.10

Chicken Paillards with Hazelnut Cream Sauce


This is another dinner for one.  And again, it is a dinner chosen by the boundaries of the pantry.  I think that cooking without a recipe is an invaluable skill.

Chicken Paillards with Hazelnut Cream Sauce

1 chicken breast
1 T butter or olive oil
2 T chopped shallots
2 T chopped and toasted hazelnuts
2 T dry vermouth
2 T mushroom broth (from rehydrating dried mushrooms)
2 T heavy cream

Slice the chicken breast on the diagonal to make 4 equal pieces.  Place each piece between two pieces of waxed paper and pound to make a thin scallopinis or paillards.

Saute the chicken pieces in butter until cooked.  Place on a plate and tent with tin foil to keep warm.  When the chicken pieces have been cooked, in the same pan saute the shallots.  Deglaze the pan with the dry vermouth and mushroom broth.  Reduce until only half remains.  Add cream and hazelnuts and again reduce until the desired thickness of the sauce has been reached.  Season with salt and pepper.  Pour the sauce over the paillards.  Serve with mashed potatoes and steamed green vegetables.

12.1.10

Pork Tenderloin with Madeira Sauce for One


My friend at lostpastremembered is going to make me a madeira convert.   I think I will, in all inevitability, have a nice bottle of madeira in my house at all times.

I bought a pork tenderloin to make prosciutto as I learned from La Table de Nana.  But I am only cooking for me!  So I decided to cut off a few medallions for dinner tonight.  This is just a simple dinner.  You could pound the slices of tenderloin into paillards, thin medallions.  But I like the medium rare of the thicker piece.

I soaked some dried mushrooms for half an hour.  Saved the liquor for another use.  Finely chopped the mushrooms.  Sauteed them with a couple of tablespoons of sweet onion.  I would have preferred shallots but this is what I had on hand.  After sauteeing the mushrooms with the onions for a couple of minutes, I added a smashed clove of garlic.  Sauteed for another minute or so and then added a splash of madeira.  I reduced this until almost dry and then added a cup of chicken broth and a sprinkle of dried rosemary.

I reduced this to a moderately thick sauce.  Meanwhile, I flash fried the medallions of pork in duck fat.

I served the medallions with stir fried green peppers and grape tomatoes.

So easy and an easy dinner for one.

19.12.09

Magret of Duck with Dried Berry Compote and Spinach Risotto


Duck is one of my favourite meats.  This is the perfect dish for the winter.

The duck breast was quickly seared in duck fat and then put in a 375F oven for about 10 minutes.  Then I put it on a plate and tented it with tin foil for 10 minutes before slicing.  Top with the compote.

Dried Berry Compote            for each serving

In the same pan that I seared the duck, I added a finely diced shallot and 1/2 t finely chopped orange zest.  Saute until transparent.  Add:
2 T mixed dried berries, coarsely chopped
2 T orange juice
1 T rice wine vinegar
2 T white wine

Reduce until most of the liquid has evaporated.