Cooking Classes

Showing posts with label vegetables. Show all posts

18.6.16

Played with my food tonight and this is what I made ...


Today was opening day for our farmers' market season. There were a few changes and I have new helpers so it was with a touch of anxiety that I awoke this morning to do it all over again.

I wish I had taken a few pictures. The market was flooded with happy people anxious to buy our offerings. I love market day. After a week of kitchen work it is time to meet your buyers face to face and enjoy a bit of camaraderie.

Tonight I played with food that arrived in my foraged food box from northern Saskatchewan. What a grand meal.

The burn morels were prime. Large, dry and not wormy. They made a flavourful risotto. Dandelion greens are heavy in the dietary fibre so no need to make a lot. Their bitter flavour complimented the risotto. And I have about 6 dozen quail eggs. It was fun to poach a couple. But seriously, they only take a minute. Quail eggs taste like chicken eggs but they proportionately have a large yolk.

Satisfying simple dinner.

13.5.16

A Sandwich Buffet or How to use up all those bits and pieces of food


It’s that time again. Seeding is in full swing and farm work becomes more active so is the busy-ness in the kitchen. Sometimes it is okay just to throw something together for lunch. This sandwich buffet uses bits and pieces of food that alone are not enough to feed a crew. It is an excellent way to use a single pork tenderloin, a couple of chicken breasts or a partial package of bacon. Then present a decadent dessert as the finale.

The components of a sandwich buffet include the protein, the crunch, the breads, butters and mayonnaise.  

Proteins are essential for muscle growth and repair. It takes the body longer to digest protein so a person feels full longer. Offer several choices of pre-sliced meats, poached fish, pates, cheeses and eggs.

Generously rub pork tenderloin or skin-on chicken breast with a seasoning mix like Creole or lemon pepper. Preheat a cast iron pan with a little canola oil and add the meat. Brown on all sides then slip it into a 350 F (180 C) oven to complete cooking, about 15 minutes. Cool and slice thinly.

Crispy comes from sliced raw vegetables such as cucumbers, tomatoes and crisp, torn lettuces. Torn lettuce can be prepared in advance because it browns more slowly than cut lettuce. Wash and shake lettuce dry and tear into serving size pieces. Then wrap it in a clean tea towel and refrigerate until serving time. Pickles, sauerkraut and a simple shredded coleslaw add flavour and crunch. 

Offer a selection of breads and buns. Baguettes make a nice chewy sandwich. Slice them horizontally for a hearty serving. Whip up some biscuits. Focaccia is simple to make in large batches. It is a flatbread and is sliced horizontally to make sandwiches.

Moisten the sandwich and also prevent juices from soaking the bread with mayonnaise, butter and mustards. Dig through the fridge for condiments like cranberry sauce, salsas and chutneys and put them on the table.
Focaccia
1 medium baking potato, peeled and quartered
1 1/2 tsp. instant yeast 7 mL
3 1/2 c. unbleached all purpose flour 875 mL
1 c. warm water 250 mL
1/4 c. olive oil, plus more for the pan 60 mL
1 1/2 tsp. salt 7 mL
Boil potato until tender. Drain and cool. Put it through a ricer and use about 1 cup (250 mL) lightly packed potato.
In the large bowl of a stand mixer combine yeast, flour and 1 cup (250 mL) warm water until combined. Cover with plastic wrap and set aside until bubbly, about 20 minutes.
Add remaining dough ingredients, including reserved potato. Mix with paddle attachment on low speed until the dough comes together. Switch to dough hook attachment and increase speed to medium. Continue kneading until the dough is smooth and elastic, about 5 minutes.
Transfer dough to lightly oiled bowl, turn the dough to coat with oil and cover tightly with plastic wrap. Let rise in warm, draft-free place until dough is doubled in volume, about 1 hour.
Cut dough in half and flatten each piece into an 8-inch disk on a large, generously oiled baking sheet. Cover dough with clean tea towel and rise until doubled in size, about 45 minutes.
Preheat oven to 425 F (220 C). With 2 or 3 fingers, dimple the dough at regular intervals. Make about 2 dozen dimples. They should almost poke through the bottom of the bread. Drizzle with olive oil and sprinkle with coarse salt.
Bake about 25 minutes or until bottoms are golden brown. Serve warm. This recipe can easily be doubled. (Cooks Illustrated)
Poblano Salsa
1 large poblano pepper, halved and seeds removed 
1 bunch scallions 
2 tbsp. canola oil 30 mL
2 tbsp. fresh mint, roughly chopped 30 mL
1 tsp. lemon juice 5 mL
1/2 tsp. cane sugar 2 mL
1/2 tsp. chili flakes 2 mL
Salt and pepper, to taste
Preheat oven to 400 F (200 C).
Place poblano halves and scallions on a baking sheet, drizzle with oil and roast until softened, about 15-18 minutes.
Remove from oven, cool slightly, then chop coarsely.
Add to a bowl with remaining ingredients and toss to combine. Season generously with salt and pepper.  (Bon Appetit)
Caramel Brownies in a Jar
There is no brownie better than a cocoa brownie. Serve these in a 1 cup (250 mL) wide-mouth canning jar or other dessert dish. Top with a scoop of vanilla ice cream and a generous drizzle of caramel sauce.
10 tbsp. unsalted butter 155 mL
1 1/4 c. sugar 315 mL
3/4 c. plus 2 tbsp. unsweetened cocoa powder 175 mL + 30 mL
1/4 tsp. salt 1 mL
1/2 tsp. pure vanilla 2 mL
2 cold large eggs
1/2 c. all purpose flour 125 mL
2/3 c. walnut or pecan pieces (optional) 150 mL
Position a rack in the lower third of the oven and preheat the oven to 325 F (160 C). Line the bottom and sides of the baking pan with parchment paper, leaving an overhang on two opposite sides.
Combine butter, sugar, cocoa and salt in a medium heatproof bowl and set the bowl over a wide skillet of barely simmering water. Stir from time to time until the butter is melted and the mixture is smooth. Remove bowl from skillet and set aside until mixture is only warm, not hot.
Stir in vanilla with a wooden spoon. Add eggs one at a time, stirring vigorously after each one. When batter looks thick, shiny and well blended, add flour and stir until fully mixed in, then beat vigorously for 2 or 3 minutes the wooden spoon or a rubber spatula. Stir in nuts, if using. Spread evenly in the lined pan.
Bake until a toothpick stuck in the center comes out slightly moist with batter, 20 to 25 minutes. Let cool completely on a rack.
Lift up the ends of the parchment and transfer the brownies to a cutting board. Cut into 16 or 25 squares. (Bon Appetit)

6.3.16

Soba Noodle Salad with White Miso Dressing

Salads are the crunchy version of a soup or stew. They can be made with whatever is at hand. My month of crunchy salads is on day 6. There is no real recipe today. Just an inspiration.

I have a few leftovers from previous meals so they came together in this salad with the addition of cold soba noodles. Cook noodles according to package instructions.

Finely chopped kale, romaine and green onions were tossed with cold cooked soba noodles and yesterdays salad dressing Miso, Carrot and Sesame Dressing. Garnished with spicy pepitas and sea buckthorn berries. Nutrition overload.

5.3.16

Miso, Carrot and Sesame Dressing

-->
This is day five in my month of salads challenge. My real meal was the shrimp bisque. This is a simple salad elevated by an interesting dressing. The recipe is from Bon Appetit. Enjoy.


Miso, Carrot, and Sesame Dressing

I have white soy paste and it is very thick and rich. I cut the amount of white miso in half. I would suggest you use it 'to taste'. 

Servings: Makes about 11/2 cups
  • 1/2 cup white miso
  • 6 tablespoons vegetable oil
  • 1/4 cup (packed) finely grated peeled carrot
  • 2 tablespoons finely grated peeled ginger
  • 2 tablespoons unseasoned rice vinegar
  • 4 teaspoons toasted sesame seeds
  • 2 teaspoons toasted sesame oil
  • 2 teaspoons honey 
  •  
Place all ingredients plus 1/4 cup water in a resealable container. Cover and shake vigorously until well combined. DO AHEAD: Can be made 2 days ahead. Cover and chill.

3.3.16

Black Kale Salad with Navy Beans

It is Crunch Challenge month. Eat a crunchy salad every day for a month. I committed to posting every day whether it was pretty or not. Today I dined a little later and the natural sunlight was fading. That makes it difficult for taking a good picture. But here it is.

I enjoyed this salad but could have thought it through a little more. The pine nuts are the same size, colour and shape as the navy beans. They taste good together but not very eye appealing. I was considering saskatoon berries to sweeten the bitter kale but took the lazy way out and used some pomegranate jelly that was hiding in my refrigerator. It worked very well. Shaved parmesan would be ideal but I had none.

The dried navy beans were cooked in my pressure cooker with 1/2 teaspoon of baking soda added to the water. Cooked for 5 minutes from the time full pressure was reached and they were perfect. The outer skins separated and rose to the top of the water. Skimming these off will solve your problem with flatulence and beans.

 My sea salt comes from an artisanal producer operating on Salt Spring Island. Canadian flavoured sea salt! Yay! The brand name is Salt Spring Sea Salt. This is pure with only balsamic and garlic added to pure sea salt.

I rarely use bacon fat. I don't like the flavour and idea of all the sulphites and additives. However, I was fortunate to find a pastured pig that was made into old style bacon. So delicious. I could not waste a drop of that liquid gold.

Black Kale Salad with Navy Beans

3 or 4 leaves of black kale, rib stripped out and leaves chopped
1 tablespoon good quality bacon fat
1/4 cup cooked navy beans
1 tablespoon pine nuts, toasted
balsamic garlic sea salt
pomegranate jelly

Saute kale in bacon fat until just tender. Arrange on serving plate. Top with navy beans and pine nuts. Season with balsamic flavoured sea salt and pomegranate jelly. Serves one.

5.2.16

The Lazy Cook's Hasselback Potatoes


Hasselback potatoes have been making their rounds on the foodie blogs and recipe websites. They originate from a restaurant that opened in 1748 in Hasselbacken, Sweden.  In the 1940's this restaurant introduced a crispy on the outside, creamy on the inside potato to their menu.

Usually a whole baking potato is laid on its side and then thinly sliced leaving about a quarter of an inch at the base unsliced. This holds the whole potato together. Then a buttery herbed mixture is slathered all over it and in between all the slices.

We swoon over the crispy edges and tender centres but the downside for me is that I can't eat a whole potato. And I don't like making those thin slices and fear for slipping and cutting right through.

This lazy cooks method is so easy. My potatoes are from the cold room and need to be peeled. Otherwise I would skip that step and go straight to slicing. A mandoline makes slicing failproof. Slice up the potatoes and slather in herby oil. You are good to go.

You will notice that I am using vintage muffin tins. These darker tins are better because, of course, they are well seasoned. Food doesn't stick so easily. But also because they are darker the food in them browns better.

Lazy Cook's Hasselback Potatoes

3-4 medium sized potatoes
1/4 c. butter, melted
1/4 c. olive oil
2 cloves garlic, roasted and pureed
1 tsp. coarse salt
1/2 tsp. dried thyme
fresh ground black pepper, to taste

Preheat oven to 375F.

Mix melted butter, olive oil and seasonings in a medium sized bowl.

Wash and peel potatoes. New potatoes or ones with relatively fresh skins do not need to be peeled. Slice thinly, about 2 mm thick. A mandoline is the easiest way to accomplish this.

Immediately place in the bowl of herbed oil and toss to coat.

Coat a muffin pan with non-stick spray. Carefully make a pile of potato slices to fill each muffin spot. You can also use parchment paper muffin papers to line the pan for easy cleaning and serving.

Sprinkle with more thyme and black pepper, if desired. Bake for 30-40 minutes, until edges of potatoes are very crispy. Serve immediately.


20.10.15

Community Supported Foraging is not for the Faint of Heart

Boreal Pestle    Clavariadelphus borealis
Every month this summer I received a box of foraged foods. August was particularly heavy with wild mushrooms. Some varieties were new to me. These are all from the boreal forests of Saskatchewan.

The boreal pestle had a sweetness to them. They didn't appeal to me so I dried them and will make a tea this winter. It will be a slightly sweet tea rich in protein and nutrients.

I understand where my food comes from and how it doesn't look like it came from a grocery store. However, I am still squeamish about worms. Some mushrooms are more loved than others by these little white worms or perhaps they are maggots. Elisabeth, my forager, said I should just dry them. "You would be surprised how much protein is in dried mushrooms." That is certainly food for thought. Well, I didn't think on it very long. Into the composter they went. Can't stomach little white worms.

The little white worms had a mind of their own, if that makes any sense at all. I have a composting pail in my kitchen. The morning after putting the wormy mushrooms into the pail, with a lid that simply sits upon it, they had attempted their escape. Little white worms laid dead and dried in a radius around my pail. I cannot imagine the energy expended to crawl up and out and down onto the countertop. A very quick wipe with a wet dishcloth was necessary and done with an attempt not to think about it too much.


Pig's Ear Gomphus clavatus
The Pig's Ear are richly flavourful. I sauteed them and put them in the freezer. I had such a variety of mushrooms that I couldn't possibly eat them all fresh.
Bellybutton Hedgehog  Dentinum repandum
These bellybuttons sauteed nicely. Very versatile.
Comb Tooth  Hericium ramosum
Combtooth was another mushroom that I dried. Not quite sure yet how I will use it. Perhaps a tea or in a ragout.

18.10.15

Rainbow of Beets and Chevre Salad


Lovely heirloom beets grilled over charcoal. Cool a bit and peel. Roughly chop. Arrange on a plate. Garnish with chevre and edible flowers. Drizzle with camelina oil and a little bit of balsamic vinegar or birch syrup. Shower with coarse sea salt. Serve.


11.8.15

Preserving the Harvest for a Brighter Winter Season

I have been eating pretty high on the hog since I picked up my CSA box from Meadowlark Farms and a CSF (Community Supported Foraging) box from Prairie Infusions.

A rainbow of beets, carrots and beans deserve more than to be devoured hungrily. As much as I know I would enjoy that I want to partake of their beauty for a bit longer. Preserving the bounty has been my agenda these past few days.

I have been learning how to use fermentation as a preservation method. My lovely red, yellow and orange carrots are in a sea salt brine. I have added fresh ginger to one jar and a Thai chili in the other. Did you know that you can add carrot tops for added complexity and flavour?

Hank Shaw of Hunter Angler Gatherer Cook fame is my reliable source of recipes using wild and foraged foods. I made his pickled chanterelles. I can hardly wait to open this jar. I look forward to fishing out the mushrooms and anointing them with camelina oil to serve with a charcuterie platter or salad.

Once you have a brine figured out you can pretty well ferment any vegetable. I have a giardiniera going in my gallon crock. I put together a medley of yellow beans, onions, zucchini, green tomatoes, carrots and hot and sweet peppers.

Pickled Chanterelle Mushrooms   from Hunter Angler Gardener Cook

I followed this recipe to a T. Dry saute chanterelles first. Clean and put them into a hot dry frying pan. Small mushrooms whole and larger ones cut into large pieces.

1 lb. chanterelles
2 c. white wine vinegar
1/2 c. water
1/3 c. sugar
2 tbsp. sea salt
2 bay leaves
2 tsp. dried thyme
1 tsp. black peppercorns

Clean mushrooms and cut into pieces, if necessary.

Dry saute in a large pan. When they give up their water sprinkle with one tablespoon of salt and the thyme. Add remainder of the ingredients and bring to a boil. Reduce temperature and simmer for five minutes. Turn off heat.

Remove mushrooms with a slotted spoon and pack into jars, leaving 1/2 inch headspace. Be sure each jar has a bay leaf and some peppercorns.

Add cooking liquid to cover the mushrooms. Wipe rims of jars and seal. Process in boiling water bath for 20 minute

Fermented Giardiniera

2 c. thinly sliced carrots
2 c. sliced red bell peppers
1 1/2 c. thinly sliced onions
3 c. coarsely chopped zucchini
a few thickly sliced green roma tomatoes
3 peeled and sliced garlic cloves
3 bay leaves
sprig of fresh thyme
3 tbsp. unrefined salt such as kosher or sea salt
6 c. filtered water


Prepare brine by dissolving the salt in water.
Mix all the ingredients except the brine in a large crock or jar.
Fill jar with the brine, leaving 1½ -2 inches of headroom—the space at the top, between the rim of the jar and the top of the vegetables. Weight the vegetables so they are completely submerged in the brine.
Cover the top of the vessel with a lid, coffee filter, paper towel, cheese cloth, or tea towel to keep bugs out.
Be sure to secure towels with a very tight rubber band or the ring from the canning jars. 
Place the jar out of direct light.
Ferment at room temperature 4 days before checking the flavor. If you prefer the flavor more sour, continue fermenting. Any foam that accumulates on the top of the brine can be skimmed off.
Transfer the jars to the refrigerator when the flavour is to your taste. 


6.5.15

Steamed Asparagus with Lemon Garlic Gremolata

Today is the last post for our Cooking Light Supper Club. It has been rewarding to share and work
together with this passionate group of gourmands. Fittingly it is spring, a time of renewal and growth. May we all find new avenues to unleash our creative spirit. Thank you to Val at More Than Burnt Toast for keeping us together for such a long time.

Now for ideas using lemons, here we go.

Val at More Than Burnt Toast has found a wonderful recipe called Pasta with Asparagus, Lemon and Prosciutto 

Shelby at Whistlestop Cafe has Lemon Sole with Lemon Caper Sauce.

Gerry at A Life, Lived has made a refreshing spring cocktail Lemon Gin Sparkling Cocktail.

Steamed Asparagus with Lemon-Garlic Gremolata

2 pounds fresh asparagus
1/2 teaspoon salt 
1/4 teaspoon freshly ground black pepper 
1 1/2 tablespoons extravirgin olive oil 
3 tablespoons minced fresh flat-leaf parsley
3/4 teaspoon grated lemon rind 
1 garlic clove, minced 

Snap off tough ends of asparagus. Steam asparagus, covered, 4 minutes or until crisp-tender. Plunge asparagus into ice water; drain. Place asparagus on a large platter. Sprinkle with salt and pepper. Drizzle with oil.
Combine parsley and the remaining ingredients. Sprinkle over asparagus, tossing gently. Serves 8.

3.5.15

Roasted Carrot, Orange and Avocado Salad


ROASTED CARROT, ORANGE AND AVOCADO SALAD


For the roasted carrots:
1 lb. carrots
1/4 tsp. coriander seeds
1/4 tsp. fennel seeds
1 sprig fresh thyme
1 clove garlic, crushed
Olive oil
Kosher salt

For the salad:
2 - 3 navel oranges
2 avocados
3 sprigs fresh cilantro
Juice of 1 lime, or to taste
Olive oil
Fleur de sel
Piment d’Espelette

Heat the oven to 400 F.

Peel and cut the carrots into serving size pieces, whatever you prefer, and place them in a bowl.

In a small dry skillet over medium heat, toast the coriander and fennel seeds until fragrant, about 3 minutes. Let the seeds cool, then coarsely crush them with a mortar and pestle.

Add the toasted spices to the carrots, along with the thyme, garlic, a drizzle of olive oil and a pinch of salt. Toss well with your hands. Transfer the carrots to a baking sheet and roast for 20 to 25 minutes, or until tender and lightly browned. Set aside.

To assemble the salad, with a sharp knife, peel the oranges down to the flesh, removing all the bitter white pith. Slice the oranges into 1/4-inch-thick rounds. Cut the avocados in half, remove the pits and peels, then cut the flesh lengthwise into thick slices. Remove the cilantro leaves from the stems.

In a medium bowl, combine the carrots, oranges and avocados. Sprinkle with the cilantro, lime juice and olive oil.  Toss gently, then divide between serving plates. Garnish with fleur de sel and piment d'Esplette.

Nutrition information per serving: 340 calories; 200 calories from fat (59 percent of total calories); 22 g fat (3 g saturated; 0 g trans fats); 0 mg cholesterol; 37 g carbohydrate; 13 g fiber; 19 g sugar; 5 g protein; 330 mg sodium.

(Recipe adapted from Greg Marchand’s “Frenchie,” Artisan, 2014)

Spring Vegetable and Goat Cheese Dip


Everyone loves the baked spinach or artichoke dip made with lots of cream cheese. Yea, me, too. I always feel so guilty because I cannot stop dipping. It is so addictive.
Well this is the answer. Equally addictive but way lower in calories, this spring vegetable dip is to die for. Ricotta replaces cream cheese. Goat cheese adds richness but not too much. 
Make this in individual consuelas so each person has their own. Or make a large casserole for a party. I bet it might even work in a chafing dish. Serve with plenty of crudités and crusty bread.

Spring Vegetable and Goat Cheese Dip
This restaurant style hot artichoke dip makes perfect party food or first course for a dinner. This can also be made with spinach. This dip is plum full of vegetables reducing any guilt you may have for indulging in the cheeses. Serve with taco chips, baked pita chips or a veggie platter.
1 c. asparagus 250 mL
1 c. leeks, white and light green parts only, finely chopped 250 mL
2 tbsp. unsalted butter 30 mL
2 tbsp. all purpose flour 30 mL
1 1/4 c. whole milk 310 mL
1 c. grated white cheddar cheese 250 mL
sea salt and freshly ground black pepper
1 14 oz. can artichoke hearts in water, drained and chopped 415 mL
1/4 c. peas, fresh or thawed frozen 60 mL
2 tbsp. chopped fresh chives or green onions 60 mL
2 tbsp. chopped parsley 30 mL
2 tbsp. chopped mint 30 mL
1/2 tsp. finely grated lemon zest 2 mL
4 oz. crumbled fresh goat cheese, divided 115 g

Preheat oven to 450 F (230 C). Prepare the asparagus and cook in boiling salted water until still crisp, about two minutes. Drain and set aside. Set aside the asparagus tips in a separate bowl.

Melt butter in a medium sized saucepan over medium low heat. Add leeks and cook until soft and tender, about 6 minutes. Stir in flour with a rubber spatula. Cook for a minute or two to remove the raw flour taste. Slowly stir in milk, over low heat. Stir while heating to a simmer. Cook until thickened and remove from heat.

Stir in cheddar until melted. Season with salt and pepper, to taste.

Add 2 oz. (55 g) of goat cheese, herbs, lemon zest, asparagus, artichoke hearts and peas. Gently mix until evenly incorporated.

Pour into a 4 cup (1 L) buttered baking dish or six individual ramekins. Arrange asparagus tips and remainder of the goat cheese on top. At this point it can be covered with kitchen wrap and refrigerated until baking, up to 3 hours.

Bake until golden brown and bubbling, about 20 minutes. Rest for five minutes before serving. 


Source: Adapted from www.epicurious.com

2.5.15

Avocado Salad with Chickpeas

The avocados are brilliant at the moment. True, they are plentiful and inexpensive but you just can't beat the flavour of in-season produce. Avocados alone are a good source of fibre but add in chickpeas and the nutritional value becomes even more complex.

Piment d'esplette is a variety of chili peppers that is cultivated in the French Pyrenees in the Basque region. It is only mildly hot so can be used freely. Locally it is used as we use black pepper. Substitute with freshly ground black pepper if you wish.

Avocado Salad with Chickpeas

This salad is a meal for one person. Increase amounts to serve more.

1/2 avocado, cubed
1/2 tomato, roughly chopped
1/4 c. cooked chickpeas
juice of 1/2 lemon
2 tbsp. olive or camelina oil
crispy iceberg lettuce
fleur de sel
piment d'esplette

Peel and cube half an avocado into a medium sized bowl. Squeeze lemon juice over and toss gently. Add the chopped tomatoes and chickpeas. Drizzle with the olive oil and toss again.

Arrange lettuce leaves on your serving plate and carefully arrange the salad on top. Drizzle with any of the dressing that remains in the bowl. Garnish with fleur de sel and piment d'esplette and serve.

11.4.15

Molasses Pumpkin Loaf with Candied Ginger

I found a little pie pumpkin (not pumpkin pie) in my cold room from last summer's harvest. After roasting it and making pumpkin puree I checked my pantry for more inspiration. With lots of raisins and candied ginger in stock I turned to my favourite cookbook, Chef Google. A quick search online yielded an interesting recipe from Suburbia Unwrapped. With a few tweaks to her recipe it was ready for the oven.

I am using spelt flour but all purpose would work equally well. If your raisins have dried out a bit, like mine were, plump them in very hot water for 15 minutes before adding to the batter. Be sure to drain them well first.

Molasses Pumpkin Loaf with Candied Ginger

Wet Ingredients
 3/4 c. white sugar
3/4 c. brown sugar
3/4 c. vegetable oil
3 eggs
1/2 c. fancy molasses
1 1/2 c. pumpkin purée

Dry Ingredients
3 1/2 c. spelt flour
1 tsp. cinnamon
1 tsp. ground allspice
1/2 tsp. ground nutmet
1 tsp. salt
1 tsp. baking soda
1/2 tsp. baking powder

1 c. raisins
1/2 c. coarsely chopped candied ginger

Preheat your oven to 350 F. Prepare two loaf pans by lightly oiling or buttering the insides.

Add all of the wet ingredients to the bowl of your stand mixer. Fitted with the whisk attachment beat until foamy and all are well combined.

Add all of the dry ingredients to a separate bowl. Whisk to fully incorporate all the ingredients.

Now switch to using the paddle attachment with your stand mixer. Add half of the dry ingredients to the wet ingredients. Beat on medium low until incorporated. Add the remainder of the dry ingredients and mix again until incorporated. Add raisins and candied ginger and mix.

Pour the batter into two prepared loaf pans. Bake at 350 F for approximately 50 minutes. Gently touch the top of the loaf. If it springs back after gentle pressure it is cooked.

Remove from the oven and let rest in the pans for five or ten minutes. Run a table knife around the sides of the cake in the pan and then invert the pan on a cooling rack. Cool about 15 minutes before slicing (if you can wait that long). Thickly slice and serve. This loaf freezes well. After fully cooled, slice and package in freezer bags. Will keep up to three months.

10.4.15

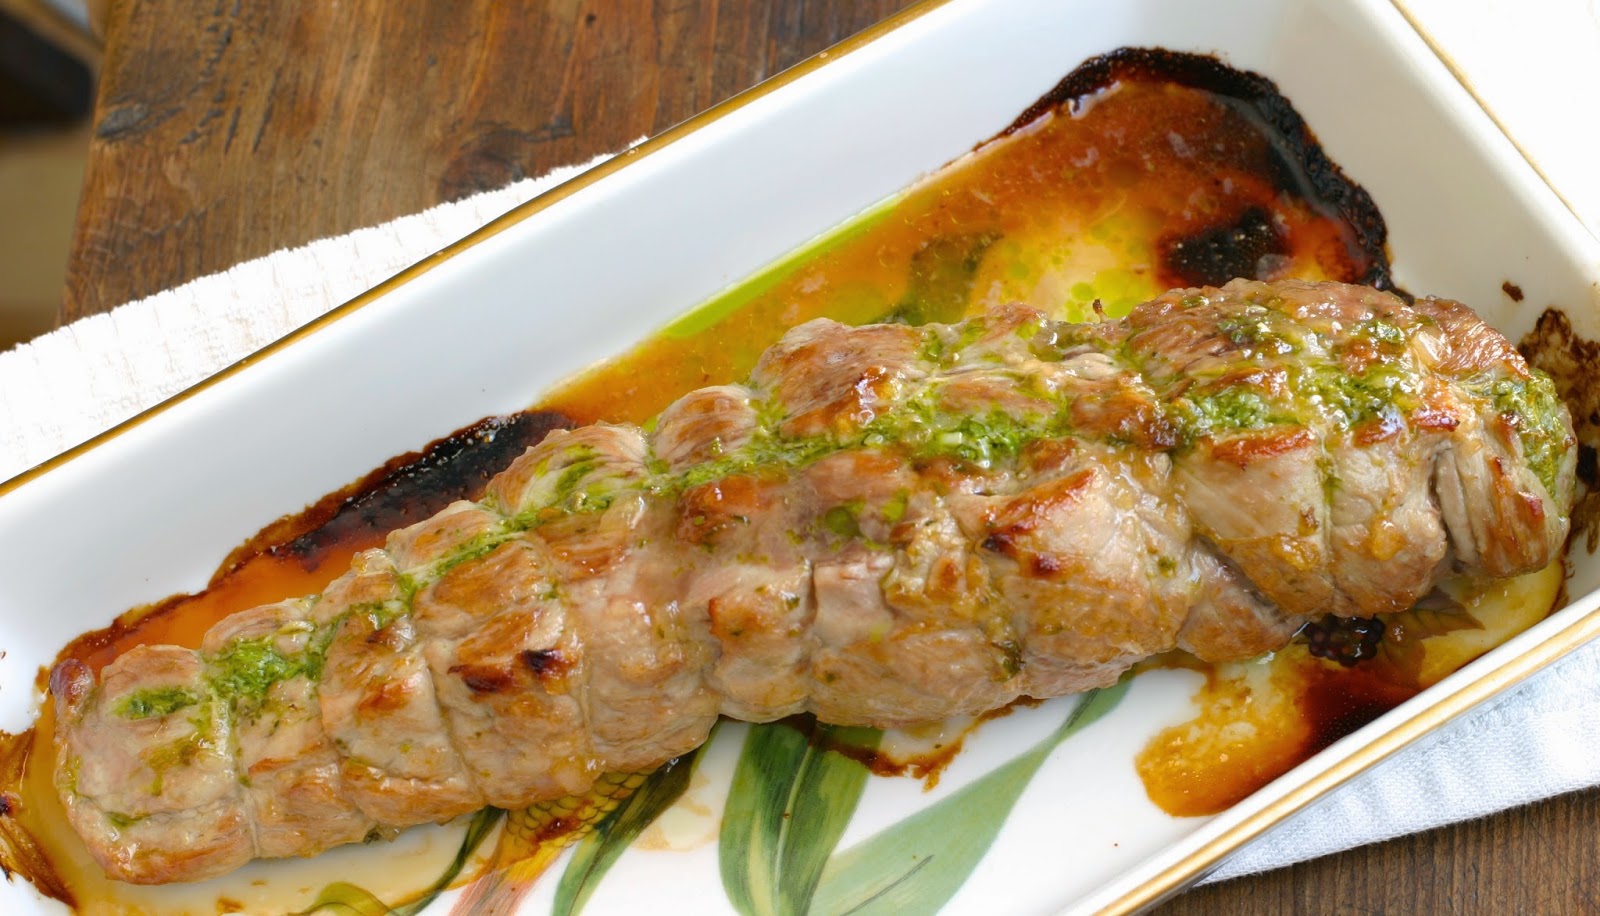
Pork Tenderloin Stuffed with Fiddlehead Pesto


I am still finding fiddleheads in the nooks and crannies of my freezer. Last spring I put together a bulk order from my little town and brought in 25 pounds of these delicate fern tips from the boreal forests of Northern Saskatchewan. I pickled a few to sell at the market. They were a curiosity and sold well. I find that a few pickled fiddleheads add an artistic touch to a charcuterie platter.

In addition to buying more than I really needed for myself there were a couple of no-shows on pick up orders. Hence, the freezer stash.

For no particular reason I have always thought these to be uniquely Canadian or at least North American. My Canadian born cousin living in New Zealand was baffled by fiddleheads until I gave a description. I have since been introduced to pikopiko ferns, as the Maori call them. This pesto is inspired by a Maori recipe.

The tenderloin would benefit from a generous crust of sea salt and coarse black pepper. I failed to think of this until it was on my fork. The pesto is not salted, other than the Parmesan cheese.

Removing the silver skin from the tenderloin takes this dish from the ordinary to the gourmet. Silver skin does not tenderize with cooking.

I was delighted to find that the unique flavour of the fiddleheads does shine through. It isn't simply a flavourful stuffing but also a delightful way to serve a vegetable.

The pesto recipe can fill three tenderloins. If you are only cooking one save the remainder to use on flatbreads and crostini just as a basil pesto might.


Pork Tenderloin Stuffed with Fiddlehead Pesto

1 pork tenderloin
1 recipe Fiddlehead Pesto


 Remove silver skin. It will not tenderize with cooking. Slit the tenderloin open.


Fill with pesto and tie shut. Season generously with salt and cracked pepper.


Heat canola oil in a large heavy bottomed pan. Brown the tenderloin on all sides. Then place in a 350F oven until it reaches an internal temperature of 160F. Remove from oven and tent with foil to rest for 10 minutes. Slice and serve with any juices that collected on the bottom of the dish.


 Fiddlehead Pesto


3 cups of boiling water with a pinch of salt
250g frozen or fresh fiddlehead greens, approx. 2 cups
1/3 cup olive oil, add more if needed
3 tablespoons crushed pine nuts or walnuts
3 garlic cloves, finely minced
1/4 cup grated parmesan cheese

Cook fiddleheads in boiling water with salt 8 minutes, drain very well. Set aside.


Crush nuts and garlic in a mortar and pestle. Add to a food processor. Add fiddleheads, olive oil and parmesan cheese. Process until smooth. Presto. You are done. Use as desired.

2.4.15

Slow Cooker Cross Rib Roast and my first time making Yorkshire pudding

I rarely use my slow cooker but this organically raised beef cross rib roast neededr longer cooking with moist heat. By the way, I won this slow cooker from cookbook author, foodista and blogger Julie at Dinner with Julie in Calgary. That was shortly after moving into my house five years ago. Sorry Julie, I have hardly used it. However, I do love it to make stock.

Celery is finally taking its place on the dinner plate. Why not? It's tasty, nutritious and cheap!

This is my first attempt at Yorkshire pudding. The batter is easy enough to make but I believe the technique is in the preheating of the muffin pan. And possibly in having just the right consistency of the batter. I used rendered fat. My freezer container wasn't labelled so not sure if it was chicken or beef or ? Whatever it was it was flavourful.

Mine were fine but I would have liked to see them rise higher. Perhaps the oven should have been hotter. Or perhaps I used a bit too much flour. Still, I enjoyed them smothered in pan gravy with my beef roast.

Garlic Herbed Cross Rib Roast


Cross rib is a less tender cut and lean. It requires a long moist cooking method to tenderize it. After rubbing the meat with oil and herb mixture, sear it in a hot cast iron pan before cooking fully in the slow cooker.

3 cloves garlic, coarsely chopped
1 tablespoon each of dried rosemary, oregano, sage,  thyme and coarse sea salt
1 teaspoon coarsely ground black pepper
camelina oil
2 - 3 pound cross rib roast
1/2 cup red wine
1/2 cup beef stock

potatoes
celery
1 tablespoon flour

Preheat a cast iron skillet over medium heat.

Mix herbs, salt and pepper in a small bowl. Blot meat with paper towel and then rub with oil before pressing the herb mixture onto it.

Add a tablespoon of oil to the preheated pan and sear the meat on all sides.

Place meat in slow cooker. Add wine and water to the cast iron pan and scrape up all the tasty bits. Add this to the slow cooker and cover with lid. Cook on high for 4 hours.

Add the potatoes, cut into 2-inch cubes or use baby potatoes. Wash celery and peel the stringy side. Cut into 4-inch pieces. 30 minutes before the meat is done add potatoes and celery. Also add flour to a quarter cup of cold water and add at the same time.

Yorkshire Pudding

1 heaping cup of all purpose flour
1/4 teaspoon salt
1 cup milk
2 eggs
6 teaspoons of lard, butter, rendered fat or oil

Add all ingredients to blender and process until smooth. Leave at room temperature for an hour.

Preheat oven to 375 F. Place muffin pan in the oven to preheat it, as well. After about 10 minutes add a teaspoon to each of six muffin molds. Continue to preheat for another 5 to 10 minutes.

Pour batter into each muffin mold equally and bake in the oven for 25 to 30 minutes, or until golden.
Serve immediately.

31.3.15

Zucchini Stuffed with Ricotta Fiddlehead Mousse


Spring is a great time of year for the food lover. Our plates will soon be filled with fresh from the garden foods. Until this new crop arrives I am using up my freezer and pantry stash from last summer.

I bet you thought this ricotta would be flavoured with the traditional basil. I like pesto made from all sorts of green herbs and vegetables and I adore this fiddlehead pesto. The flavour is all fiddlehead and so fresh.

For April our group has this wonderful line up of foods that just might fool you ...

Creamy Baked Eggs with Asparagus and Pecorino from Sandi at Whistlestop Cafe
April Fool Spicy Shrimp with Grits from Jerry at A Life Lived
Chicken BLT Sandwich from Val at More Than Burnt Toast
Shelby at Grumpy's Honeybunch winds up with this seasonal dessert - Rhubarb Trifle


Zucchini Stuffed with Ricotta Fiddlehead Mousse

I always make my own ricotta. It is so easy, so fresh and half the cost. Click on the link for my recipe and directions.

6 small zucchinis
1 cup homemade ricotta
1/4 cup fiddlehead pesto
1/4 cup freshly grated Reggiano Parmigiano
1 tablespoon fresh lemon juice
salt
pepper

Preheat oven to 450 F.

Slice zucchini in half lengthwise and scoop out pulp to leave a 1/4 inch shell. Reserve the pulp for another use.

Combine the remainder of the ingredients stirring well with a whisk. Fill zucchini with the ricotta mixture, pressing firmly.

Bake at 450 F until zucchini is tender, about 20 minutes.


Fiddlehead Pesto Recipe 

3 cups of boiling water with a pinch of salt
250 g fresh or frozen fiddlehead greens
1/3 cup olive oil, add more if needed
3 tablespoons crushed pine nuts or walnuts (optional)
3 garlic cloves, finely minced
1/4 cup grated parmesan cheese  

Cook fiddleheads in boiling water with salt 8 minutes, drain very well. Add fiddleheads, nuts and garlic, slowly adding the 1/3 cup of olive oil, blend well. Add about 1/3 of the parmesan cheese, mix, add balance of cheese, stopping to scrape down sides of container. Process or blend until fiddlehead pesto forms a smooth paste consistency.